If you’re new to ice fishing or have been ice fishing for years but have yet to find the right spot to fish in, a flasher fish finder can be a powerful tool in your arsenal. A flasher is a valuable device that can help you find and catch fish in your favorite fishing spot. A flasher emits a high-pitched sound that attracts fish. The device has a built-in receiver that will pick up the sound and display the location of the fish on a map.
However, many ice anglers don’t buy it because they find it difficult to use. After researching thoroughly, in this article, I will teach how to use a flasher in 2024. So, you can easily catch fish in your favorite fishing spot, and you will be amazed to know how easy it is to use.
Steps On How To Use A Flasher In 2024
Check your Flasher has Power
The first step is to make sure your Flasher has Power. If your Flasher has no power, it will not go very far. Flashers are connected to batteries; first, check your battery is charged and whether it is giving Power to the Flasher. You can do this by analyzing your battery terminals, and you will have to ensure that leads are attached to these terminals. Pair it with a lithium shuttle.
For users of the lithium shuttle, keep in mind that your lithium shuttle power button is on and the connection is secure. Now, turn on your Flasher and place it near the ice fishing hole.
Set the Transducer Length
Now, you have to set your transducer length, which is the most important step. Simply drop your transducer down the ice hole, depending on the type of Flasher you own. It will make sure that you are not receiving any interference from the ice. If your transducer length is high enough in the ice column, the signal will bounce off the ice, and it will affect the clarity of the graph. So, position your Flasher down enough to read through the ice well and short enough that it doesn’t get caught in your fishing line.
Set The Range
After setting the transducer length accurately, you will have to start setting your range and always remember flashers differ widely in their capability to read certain distances. It has the capability to inform you how much water you are fishing in. As soon as you know the depth, set your depth to your Flasher so that it is at the next deepest range setting. Suppose your depth is 30 feet. Set your bottom to 33 feet in order to give yourself extra room.
Adjust The Gain
Now, you have to optimize your gain settings. It helps to adjust your sensitivity as soon as you power up your Flasher that you will not be marking at the bottom. To control sonar signals, which move at the bottom of the water from the transducer and returns to the machine.
It depends on the water’s depth; the deeper the water, the more gain you will require. In order to do this, you have to turn up the gain to get a powerful signal and turn down the gain to see a dim signal. If you set the gain very low, you will not be able to catch the signal of your lure. I would suggest setting the gain slowly until the screen starts to clear.
Use The Zoom
After optimizing the gain, you can use the zoom feature in order to get a clear picture of the bottom of the water or if you want an idea of what is happening underneath. You should use this feature in that water portion where there are many fishes. If you are fishing in deep water and catching walleye, zoom in, so the ground appears ten feet down. You can do this by pressing the button on the Flasher. It will zoom the first five feet of water depth. You can also use the up and down feature to zoom in on your desired location.
Repeat the process again by pressing the button to zoom in on the first ten feet of water depth. By pressing the button a third time, it will be back to the regular mode.
Drop Down your Lure
When you drop your lure down, make sure that you will see it clearly on the screen by adjusting the gain. It will appear like a bar. If you need clarification about whether you are seeing your fishing line or your lure, try jigging your rod up and down, as it will reflect the movement on the screen, and you will find your lure.
If your lure does not look like a solid line, shift the gain up, then it will be a steady line and won’t flicker. Now, any further line that you see between the bottom and the ice will be a fish.
How to Read A Flasher
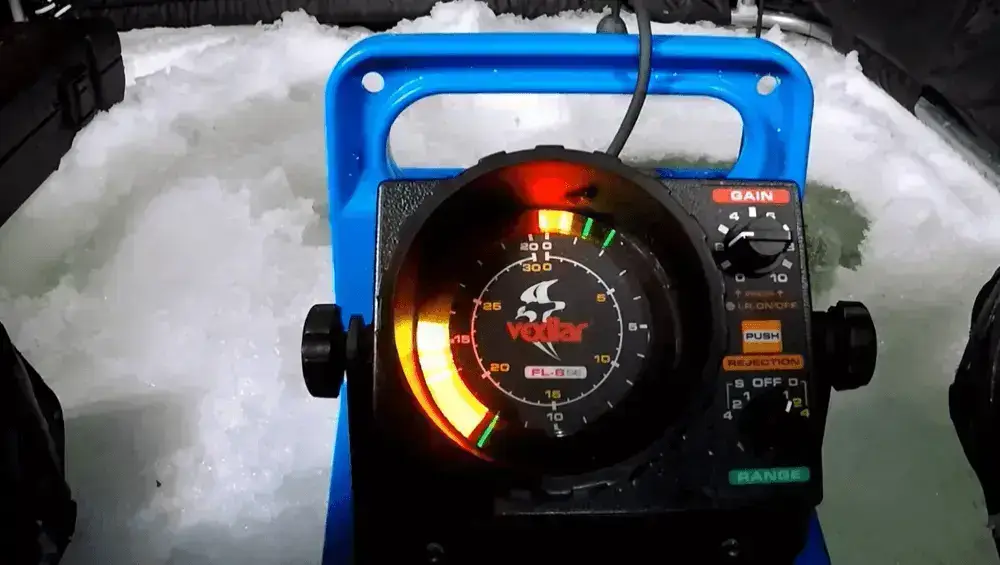
Learning how to use a Flasher is good but you must know how to read a flasher. The Flasher displays the bottom of the water, your lure, and, more importantly, your fish. Reading a flasher is easy. You just have to indicate the colors because they will let you know the object size. Red denotes the large object, yellow denotes the medium object, and green denotes the small item.
As soon as you drop your transducer in the ice hole, the Flasher will present the bottom as a red bar. If the Flasher displays a green bar, it means that it is indicating vegetation. If there are green/yellow lines, then there might be a small fish hanging out. The Red/yellow bar above the bottom indicates a fish. As soon as you drop your lure down, the Flasher will display the lure as a yellow/green bar.
FAQs
what is better, a flasher or a camera?
To be honest, the flasher fish finder is worth it and is perfect for detecting fish. No matter at which depth you are fishing, it will detect fish in a vast range and produce greater clarity than a camera.
do you need a flasher for ice fishing?
Yes, you should use a flasher fish finder because they are very useful for any type of angler. The biggest benefit is that it can tell you what is happening at the bottom of the ice. I know it is a little difficult to understand, but when you become a master at reading your Flasher. You can catch fish in minutes.
conclusion
Finally, we are at the end of our review. I hope that your confusion is cleared now and now you know how to use a flasher. A good flasher makes a huge difference in finding fish on the ice.